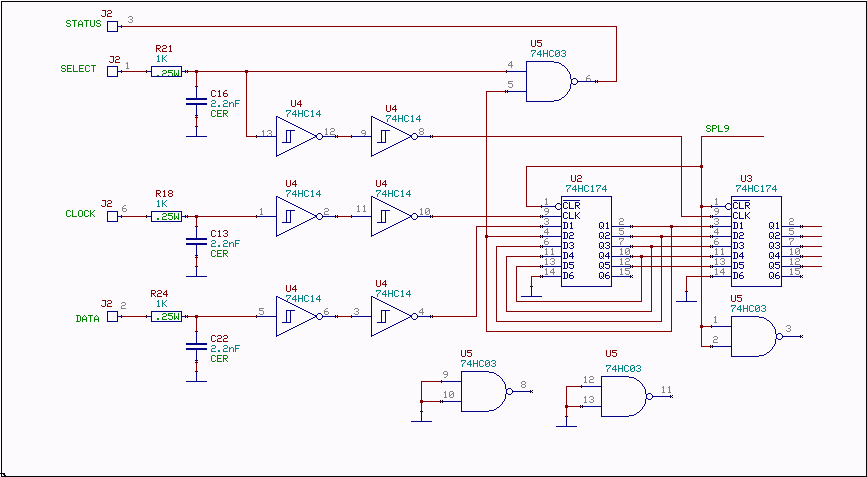
Fig. 1.The schematic diagram for one control unit.
The simple serial interface of WSE unitsIn order to avoid a clock with could produce spurious signals, the WSE units are designed to use a level controlled serial interface. The clock is one of the serial interface wires and it is at rest during normal operation. Figure 1 shows the schematic diagram. DATA, CLOCK and STATUS are connected in parallel for all units but select is a separate line for each unit.The discussion below might be confused by the different meanings of status In the digital world the meaning of status can be, for example:
In the following discussion, in fact, "status" takes on each of the above meanings. To try to reduce the reader's confusion, "STATUS" [all caps] will be used when referring to the "Status Line" [pin 3] of the WSE units. For other uses, the word will be in small letters, and the text will try to make the context clear. |

Fig. 1.The schematic diagram for one control unit. |
|
The way of operation of the WSE interface is like this:
Linrad has one option in the main menu: "Z=Hardware interface test". This test is located in the source code file hwaredriver.c together with the other hardware related routines. If you want to control more hardware from inside Linrad or if you want to use the parallel port pins differently, add your own files users_hwaredriver.c and/or users_hwaredef.h look at users.c for information about what the hwaredriver.c routines do. Make users_hwaredef from users.h with pin definitions of your choice if you want to use the default hardware control routines of Linrad but with other pin configurations. (users.h and the users_hwaredef.h option is new from Linrad01-19) You may for example control more than 8 units by adding a decoder on the parallel port pins. This way you can control up to 255 units. After adding users_hwaredriver.c or users_hwaredef.h you must run configure to have your own files replacing the contents of the default files. The default version of "Z=Hardware interface test" will generate a screen like the one in fig. 2. |

Fig. 2.The default hardware interface test. |
|
To check your system, press the keys "0" to "7" to set up the address of the unit you want to check. This way you should arrange for SELECT of one and only one WSE unit to go high. In fig. 2 bit 4 corresponding to pin 6 is set. At the right of address status line you can read RX10700 because hwaredef.h has defined RX10700 to be 16 (default) The status of the input ports is in the bottom of fig. 2. The column for pin 10 is red. This is because hwaredef.h has defined this to be the status pin, the one connected to the STATUS line (default). By pressing "C" you can toggle the clock pin between H and L. When it goes from L to H the data of the STATUS line should appear on the screen for the input pin used. Note that pin 11 is inverted while the other pins are not, a peculiarity of the PC parallel port. The STATUS line needs a pull up resistor to keep the line high when none of the open colletors in the 74HC03s wants to pull the line low. The pull up resistor is usually present internally in the PC, but sometimes only pin 10 has a pull up resistor. (That is why Linrad uses pin 10 for default) The clock transition H to L has no effect but L to H will produce the result of fig. 2 for the pin in use if the DATA line is H. If you want to investigate what goes on on the serial interface lines, do not use a voltmeter on the d-sub. There is +15V and -15V on the pins and the unit will fail if these voltages reach the serial interface lines. You may also damage the PC parallel port. If you want to monitor what happens, open the box and measure the voltages on the ICs. Default pin connectionsThe 9-pin d-sub connector should be connected like this for the RX10700, RX70 and RX144 units:pin 1 = SELECT pin 2 = DATA pin 3 = STATUS pin 4 = -15V DC, 0.65A pin 5 = +15V DC, 0.65A pin 6 = Clock pin 7 (Not connected) pin 8 (Not connected) pin 9 = DC ground The RXHFA unit contains two control units like figure 1 so it needs two select lines like this: pin 1 = SELECT freq pin 2 = DATA pin 3 = STATUS pin 4 = -15V DC, 0.65A pin 5 = +15V DC, 0.65A pin 6 = Clock pin 7 = SELECT gain pin 8 (Not connected) pin 9 = DC ground The DATA, STATUS and CLOCK pins are connected in parallel with the same pins on all the WSE units and any other hardware that you might want to control via this simple interface from Linrad. The SELECT pin may be connected to one of the 8 data bits of the parallel port in case 8 units or less are used, otherwise the 256 different values obtainable from the 8 bits may be decoded by some suitable hardware. In case you want to use the default drive routines that are contained in hwaredriver.c of the Linrad source code, connect the parallel port like this: SELECT (RX10700) = pin 6 SELECT (RX70) = pin 7 SELECT (RX144) = pin 5 SELECT (freq,RXHFA)= pin 3 SELECT (gain,RXHFA)= pin 2 DATA = pin 17 STATUS = pin 10 (or as specified in users_hwaredef.h) CLOCK = pin 1 DC ground = pin 23 |