A Brief Getting Started with dttsp for Linux Helper Page
by w3sz 8/3/2006 [revised 3/06/09]
Some of this is old information from long-ago Ubuntu Dapper days and may not apply today. Unless the section you are reading is indicated as having been recently updated, Caveat Emptor!!
This page is devoted to describing how to get DttSP and the SDR-1000 or HPSDR [e.g., Mercury] control software and associated GUIs running on Linux. The steps in the hyperlinks below take you through the process of getting things up and running, starting with downloading and installing Ubuntu. If you are interested in this stuff you really need to join the dttsp-linux group on Yahoo. A general bit of advice: ALWAYS, ALWAYS, ALWAYS follow the 'official' installation instructions first. My suggestions are to be considered ONLY in the event that the 'official' instructions fail to produce a working installation.
1.
Download Ubuntu and Install it on the Hard Drive [updated 2/8/2009]
2. Add pre-requisites and useful files to Ubuntu and Install DttSP [updated 2/8/2009]
4. Download and Install Java-SDR, John Melton's Java-based GUI [Updated 2-28-2009]
5.
Download Edson Pereira PU1JTE/N1VTN's GUI [SDR-Shell] and associated
files including [old] DttSP source [Updated 2-8-2009]
6.
Start sdr-core with Edson's script [updated 2-28-2009]
6a.
Modifying Edson's SDR-Shell to work with the HPSDR Mercury [Updated
3-20-2009]
7. Getting Bob Cowdery's Acorn working under Ubuntu Linux [Updated 3-9-2009]
7a. Setting Bob Cowdery's Acorn up to work across the Network [Updated 3-10-2009]
8. How to get SDR-1000 Hardware Control working under Ubuntu Linux [Updated 2-11-2009]
9. How to get Presonus Firebox working under Ubuntu Linux [updated 2-13-2009]
10. How to get DttSP PortAudio version working under Ubuntu Linux [Dapper]
11. How to use separate soundcards for input and output
12. How to use OSS instead of alsa
13. Install the software and associated GUIs as a Debian archive ( .deb ) file This is the easiest way to get dttsp, the SDR-1000 hardware control software, and the great GUIs for both up and running. If you do this you can ignore steps 2 above and 4-8 and 16 below!! Let me know if you try this and have problems! This has been extensively tested for Ubuntu only. I can't offer advice for Kubuntu or any other non-Ubuntu distributions. [NB Debian file is currently out of date and will not work with current versions of Ubuntu. I hope to find the time to make a new one some day.]
1. Download Ubuntu and Install it on the Hard Drive [Updated 2/8/2009]
Download the Ubuntu desktop iso
from:
http://www.ubuntu.com/getubuntu/download
Make
a CD from the iso file.
Boot using the CD.
Install
Ubuntu on your hard drive by clicking on "Install". DO NOT
expect to be able to login as root. Ubuntu will NOT allow this, by
default. Make sure you pick a user name that is not 'root' and make
sure you give yourself a password. Otherwise you won't be able to log
on to your new operating system!
Boot into your new hard disk
version of Ubuntu.
Open a terminal window. If some of the
commands don't work due to permission problems because you are not
root, then type 'sudo' before the command. It’s easiest to get
things set up if you are operating as root. That is what I did. Once
you have logged in to Ubuntu with a user ID, you can change it to
allow root logins by clicking on System>Administration>Login
Window>Security and checking the box for "Allow local system
administrator login". If you don't operate as root, you will
need to 'sudo' before each apt-get command, and before some other
commands as well.
Back to top
2.
Add pre-requisites and useful files to Ubuntu and Install DttSP
[Updated 2/8/2009]
There is an excellent summary of how to install prerequisites and gnuradio at http://gnuradio.org/trac/wiki/UbuntuInstall
GNU Radio is needed if you are going to use the new Virtual Radio portion of DttSP. GNU Radio can be downloaded from the GNU Radio subversion repository with:
There is an excellent set of notes on
compiling and installing DttSP and SDR-shell by Andrea Montefusco
at:
http://code.google.com/p/sdr-shell/w/list
Here is what I did here:
type
"apt-get update" [don't forget, you might need to add
'sudo' at the beginning of the command].
use Synaptic to get
and install each of the files below, or install them manually using
apt-get by typing:
apt-get install make gcc g++ autoconf
automake1.9 subversion manpages-dev
apt-get install libtool
python-dev
apt-get install libfftw3-3 libfftw3-dev libgsl0-dev
apt-get install libqt3-mt
apt-get install libqt3-mt-dev
Then continue with :
apt-get install
linux-rt
apt-get install liblo0 liblo0-dev
You can combine multiple files after one apt-get install instruction. I did them one or a few at a time so I could more easily spot any problems with the download/installation process.
If you are going to use the Virtual
Radio portion of Dttsp with GNU Radio, there are some other
prerequisites as well. I did:
apt-get install libtool
sdcc-nf
apt-get install guile-1.8 guile-1.8-dev
guile-1.8-libs
apt-get install ccache
apt-get install
python-dev python-opengl python-cheetah python-lxml
python-qwt5-qt4
apt-get install libcppunit-1.12-1
libcppunit-dev
apt-get install libgsl0-dev libgsl0dbl
apt-get
install libboost1.35-dev
apt-get install libusb-0.1-4
libusb-dev
apt-get install wx-common python-wxgtk2.8
python-wxversion
apt-get install python-numpy-ext
apt-get
install alsa-base libasound2 libasound2-dev
apt-get install
libqt4-core libqt4-dev libqt4-assistant libqt4-designer libqt4-gui
libqt4-help libqt4-network libqt1-opengl libqt4-qt3support libqt4-dev
qt4-dev-tools
apt-get install libsdl1.2-dev libsdl1.2debian
libsdl1.2debian-alsa libsdl-image1.2 libsdl-ttf2.0-0
apt-get
install swig
apt-get install libqwt4c2 libqwt5-qt4
libqwt5-qt4-dev libqwt-dev
apt-get install libqwtplot3d-qt3
libqwtplot3d-qt3-dev libqwtplot3d-qt4 libqwtplot3d-qt4-dev
apt-get
install doxygen usbview octave3.0
If you are going to use the Virtual
Radio portion of DttSP rather than just sdr-core, then you also need
Erlang and Yaws in addition. A good description of what is needed is
at:
https://www.cgran.org/browser/projects/dttsp/branches/ab2kt/vr/README?rev=157
I downloaded Erlang as a tarball from: http://www.erlang.org/download.html
I used version R12-B5 and installed it by using instructions from http://ciarang.com/posts/compiling-erlang-on-ubuntu
except that I of course used the newer
version, R12-B5.
I then downloaded yaws-1.79 as a tarball
from http://yaws.hyber.org/index.yaws
and installed it with the usual ./configure make make
install sequence of commands.
You will also need, whether you
are using the Erlang or the 'standard' portion of DttSP, Jackd and
related files.
The stock versions of jackd and related files
did NOT work properly for me with the new DttSP, so I used tarball
versions as will be shown below. So I did NOT use the following line.
I would suggest you NOT use it as well.
apt-get install jackd
qjackctl libjack0 libjack-dev
Initially I installed jackd from
http://jackaudio.org/download
and downloaded the tarball version of
jackd:
jack-audio-connection-kit-0.116.2.tar.gz
but
I ended up using the svn version 3333 of jackd, current as of
2-21-2009. I got this by using the command:
svn co
http://subversion.jackaudio.org/jack/trunk/jack
I also had
to use the non-Ubuntu standard tarball version of ffado from
http://www.ffado.org/q=release/rc1
,
http://www.ffado.org/files/libffado-2.0-rc1.tar.gz
To install ffado I needed to download
scons. The standard Ubuntu version of this from Synaptic or apt-get
install methods worked fine.
I also used non-Ubuntu-packaged,
more recent versions of libraw1394, libavc1394, and libiec61883.
libraw1394 and libiec61883 came
from
http://ieee1394.wiki.kernel.org/index.php/Release_Notes_-_Libraries
I
used version 2.0.2 of libraw1394 and version 1.2.0 of libiec61883.
libavc1394 came from
http://sourceforge.net/projects/libavc1394/
It
is version 0.5.3.
Install these in the order: libraw1394, then
libiec61883, then libavc1394, then scons, then ffado, and finally
jackd.
If the jackd directory doesn't have a file named configure
already in the directory, then do:
./autogen.sh
–with-default-tmpdir=/dev/shm before doing the usual:
./configure
make
make install .
For libraw1394 and the others, if
there is not a file 'configure', then do:
autoreconf -f -i
-s
before doing the usual:
./configure
make
make install
.
You can download qjackctl from
http://qjackctl.sourceforge.net/
I
downloaded version 0.3.4.
I got DttSP from the subversion
repository by creating the directory dttsp, cd-ing to it, and then
typing:
svn co https://www.cgran.org/cgran/projects/dttsp
This
will download the DttSP files to the directory ../dttsp.
You then need to go to the subdirectory ../dttsp/branches/ab2kt/sdr-core/base/lib/pylib-0.7.1/src and compile pyliblo by typing in that directory: ./setup.py install
You also need to compile simpleosc0.2.5 in the directory ../dttsp/branches/ab2kt/sdr-core/base/lib/simpleosc0.2.5 by typing in that directory: python setup.py install
Then you can go to the directory
../dttsp/branches/ab2kt/sdr-core/base/src and
type:
./bootstrap
./configure
make
make install
and
the ab2kt branch of sdr-core will be ready to use.
If you want to use the n4hy branch, go
to the directory ../dttsp/branches/n4hy/sdr-core/base/src and do the
same, starting with ./bootstrap
If you are missing liblo.c you
can download it from here
To use the new Virtual Radio portion of DttSP, follow the directions from Section III "Operation" of:
https://www.cgran.org/browser/projects/dttsp/branches/ab2kt/vr/README?rev=157
These instructions are also a part of the DttSP installation, located at: ..dttsp/branches/ab2kt/vr/README.
Go to ../dttsp/branches/ab2kt/vr/erlang and type make.
Then add the following line to your $HOME/.erlang file [create the file if it is not there already]: code:add_path("/usr/local/lib/yaws/ebin").
NOTE THAT THE PERIOD [FULL STOP] AT THE END OF THE LINE IS PART OF THE CODE!!
In $HOME/.bashrc, add
export ERL_LIBS=<path to the local working copy
of the svn VR erlangdirectory> [which in this case is
/dttsp/branches/ab2kt/vr/erlang
I also added the following
line to the .bashrc file, because I had problems with sdr-core and
ozy not finding the library libjack.so.0 without it:
export
LD_LIBRARY_PATH=/usr/local/lib:/usr/local/lib64:/usr/lib32
Once you have made these changes to .bashrc, type "source ~/.bashrc" in your terminal to apply the changes.
Then you are ready to play with the Virtual
Radio, following the instructions in:
https://www.cgran.org/browser/projects/dttsp/branches/ab2kt/vr/README?rev=157
These instructions are also a part of the DttSP installation, located at: ..dttsp/branches/ab2kt/vr/README.
3. Get JAVA [Updated 2/8/2009] if you are going to use John Melton's Java-based GUI.
If you are going to use John Melton's Java-based GUI,
then install Sun Java 6, Sun-Java 6 Runtime, Sun Java 6.0 Plugin, and
NetBeans 6.1 and make this Java the ‘default’ Java on your
machine.
To do this you must make sure that you have the
Multiverse repository enabled.
Click on System >
Administration > Software Source > Select Multisource >
Close
Then do:
sudo
apt-get install
sun-java6-bin sun-java6-jre sun-java6-jdk
Then
you need to make this Java the default by editing the file /etc/jvm.
Make its first line: /usr/lib/jvm/java-6-sun
Set
the environmental variables by editing /$HOME/.bash_profile:
export
JAVA_HOME=/usr/lib/jvm/java-6-sun
export PATH=$PATH:$JAVA_HOME/bin
Here is another way to do the installation:
http://techreviews.in/installing-java-in-ubuntu-810-intrepid-ibex/
Install NetBeans by going to the Pull-Down Applications>Add-Remove and selecting All Open Source Applications and then Searching for NetBeans, and installing it.
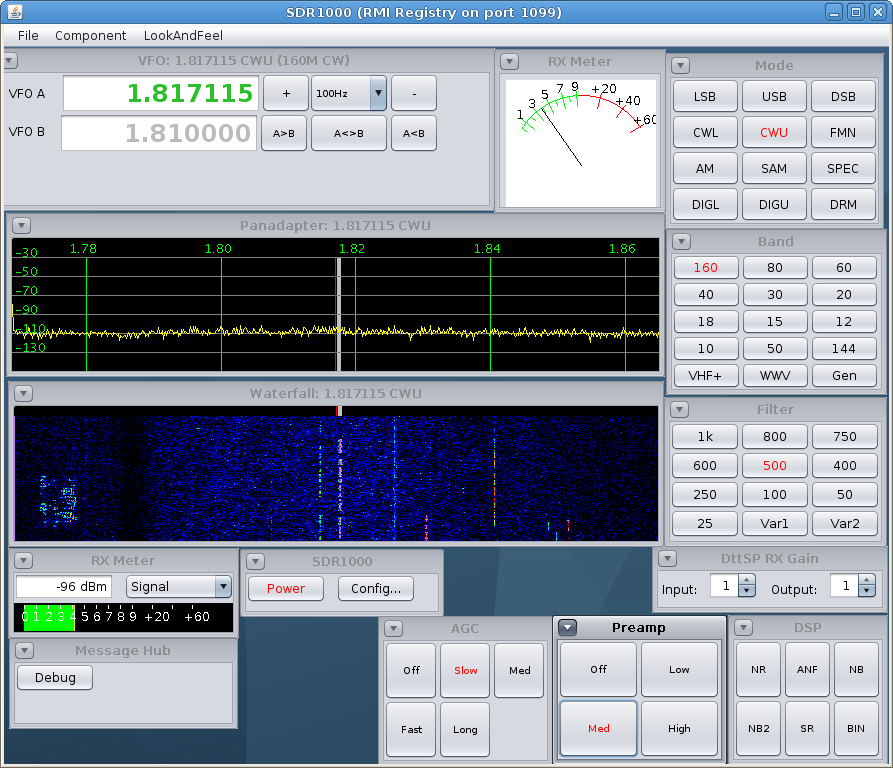
4. Download and Install Java-SDR, John Melton's Java-based GUI [Updated 2-28-2009]
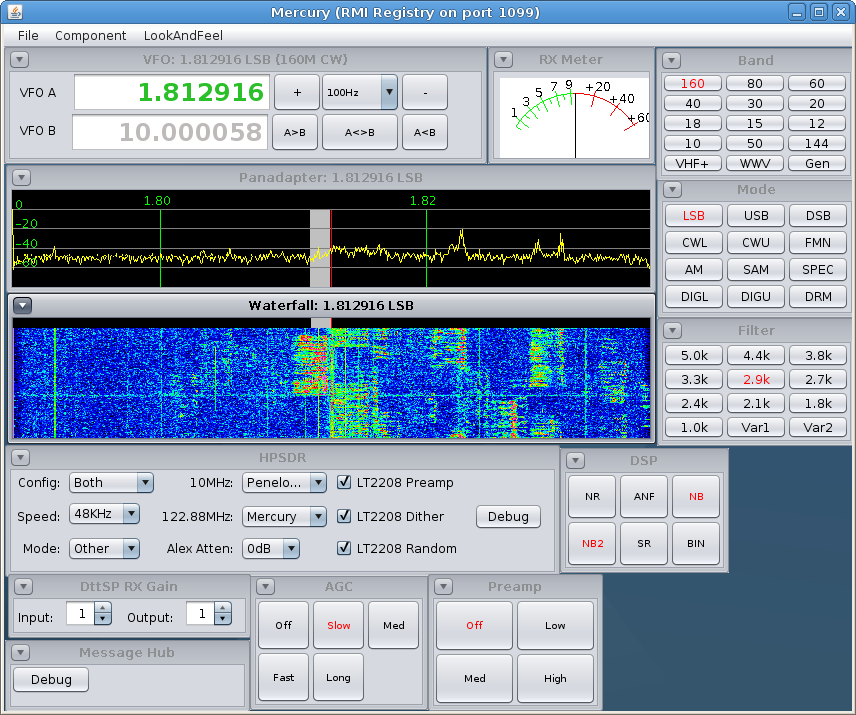
John
Melton N6LYT has developed a great, configurable Java GUI for
DttSP!
His homepage for this software is at:
https://java-sdr.dev.java.net/
On
that page John has a description of Java-SDR, screenshots, and
Install instructions for Fedora, Ubuntu, Mac OS. You can also find
there instructions for compiling and running the software with
NetBeans. There are also application notes and an Architecture
diagram.
I find it easier to run the software from a command line, or using script files, as will be noted below.
After
you have downloaded Sun Java 6 and NetBeans, as noted above in
#3, do the following:
Download JavaSDR by typing:
svn
checkout https://java-sdr.dev.java.net/svn/java-sdr/branches
Radio
You will need to install libusb 1.0. You can get this
from:
http://libusb.wiki.sourceforge.net/Libusb1.0
If
you are going to be using the GUI with Mercury, then you also need to
get and install the software to initialize ozy [initozy], and the
software to allow Mercury to work with jack [ozy]. Both of these are
included in the hpsdr repository.
Ozy can be downloaded by
typing:
svn co
svn://206.216.146.154/svn/repos_sdr_hpsdr/trunk/N6LYT/ozy
Go
to the directory /hpsdr/trunk/N6LYT/ozy and type:
make
This
completes the installation of ozy.
To install initozy, first
download it by typing:
svn co
svn://206.216.146.154/svn/repos_sdr_hpsdr/trunk/OzyJanus-Jack
Then
go to the directory /hpsdr/trunk/OzyJanus-Jack and
type:
./configure
make
make install
I run all of this
as root. John Melton made a file that you can add to
/etc/udev/rules.d called 90-ozy-rules that
will create a file /dev/ozy with permissions that allow you to access
Mercury as any user. He also made a similar file for the SDR1000,
90-sdr1000-rules
The steps you
need to do to run the GUI are:
initialize ozy [run initozy] [for
Mercury only]
start jack [jackd]
start DttSP [sdr-core]
connect
Mercury [or the SDR1000] to jack and DttSP [jack_connect or
qjackctl].
For running Mercury, I do all of these using a
script called javamerc that calls a couple of
other scripts modified from ones John provided in the directory
/Radio/Radio. These scripts are named start_base_mercury
and start_radio_mercury. For the
SDR1000, the calling script is called javasdr.
It calls start_base_sdr1000 and
start_radio_sdr1000. The links will
take you to these scripts. The start.x.x scripts are in John's
directory /Radio/Radio in their original forms. My scripts are set up
for use with the firewire driver and the Presonus Firebox as the end
of my audio chain.
The .radio. scripts are setup to use
127.0.0.1 as the server. If you want to change that, you need to
change the line #SERVER=127.0.0.1 to SERVER=xxx.x.x.xxx where
xxx.x.x.xxx is the IP address of the server you want to use. Having
the line commented out as I do defaults to 127.0.0.1.
Analyzing
the linked scripts will allow you to figure out what needs to be done
for your particular installation.
John Melton explains what to
do one the GUI pops up:
-------start of John's instructions:
You
should now have an empty window.
Expand the window size and
select the look and feel you want (Nimbus is probably the best).
Using Component->New ...
The base system must have an
RMI registry, so select that component first.
After selecting
the following components you may want to resize and move them, and/or
resize the main windows. The defaults are to locate them top left and
the sizes are not great to start with yet.
You will also need
a Message Hub, so select that next.
Select DttSP RX to
provide an interface to DttSP for receiving.
Select HPSDR as
the hardwrae interface.
Select a VFO.
Select a Band,
Mode, Filter object and resize and move them to where you want them.
Select a Panadapter.
At this point you should be able
to see the panadapter display and be able to tune either by left or
right mouse clicking on the panadapter display, or by dragging the
panadapter display, or using the up/down buttons in the vfo. Also a
scroll wheel will work when the panadapeter has focus.
This
should give you a basic receiver running for a start.
-------end
of John's instructions
Once you have the GUI up and running
for Mercury, you should set the clock sources so the 10 Mhz source is
Penny and the 122 MHz source is Mercury.
This
is a great program, but there are a few quirks, at least as of March
9, 2009:
When you are also running another CPU intensive task, you
will find that Java-SDR will occasionally lock up.
For the
SDR-1000, clicking on the waterfall produces twice the desired
frequency shift, so the desired signal ends up on the other side of
the filter passband instead of within the filter passband.
For the
SDR1000 to be controlled by Java-SDR, I had to disable some of the
error checking in sdr1000.cpp, and add another include file. The
changes are reflected here.
Error
messages of the following form are received when Java-SDR is used
with the SDR-1000:
SDR1000: received command from 127.0.0.1:
UpdateHW 1
commands.CommandDatagram.write: localhost:19501:
java.net.SocketTimeoutException: Receive timed out
Messages of the following form are received when Java-SDR is used with Mercury:
jack_ringbuffer_get:
buffer=57817 wanted 1024 got 1023
jack_ringbuffer_get:
buffer=57825 wanted 1024 got 1022
jack_ringbuffer_get:
buffer=57864 wanted 1024 got 715
jack_ringbuffer_get: buffer=58228
wanted 1024 got 870
jack_ringbuffer_get: buffer=58229 wanted 1024
got 1008
Note that I have thus far used Windows tools to update the firmware in Mercury. The software you need to do this is in the svn at: svn://206.216.146.154/svn/repos_sdr_hpsdr/trunk/USBBlaster-Binaries
There
is another script killsdr that I run after
ending a Java-SDR session, that kills any running instances of the
following files, so that a new javasdr session can be cleanly started
with no problems caused by already running instances of associated
processes:
jackd
sdr-core
socat
passport
java
sdr1000.32
sdr1000.64
sdr-shell
sdr1000
ozy
qjackctl
To control the SDR-1000 via Java-SDR you need to download and compile sdr1000.cpp by John Melton. Here are the steps involved:
1. Download sdr1000.cpp from here
2. Create a directory sdr_repos_linux [mkdir /sdr_repos_linux]
3. Type: svn co svn://206.216.146.154/svn/repos_sdr_linux/trunk/hardware/ /repos_sdr/_linux
4. cd /repos_sdr_linux/sdr1000/build and alter the makefile by replacing all instances of hw_test with sdr1000, or just replace the Makefile in that directory with this one
5. Copy the file sdr1000.cpp to the directory: repos_sdr_linux/sdr1000/test
6. cd /repos_sdr_linux/sdr1000/build and then type make
7. Determine your printer port if you don't know it by typing cat /proc/ioports and looking for parport0 [assuming you are using parport0]
8. Optionally change the default printer port by replacing 0x378 with your parport address in the line at the bottom of sdr1000.cpp and recompiling.
9.
Add the following lines near the end of your start_base_sdr1000
script, before the line: echo "kill -9 $!" >>
kill.all.base , if they are not there already :
USB=0
RFE=1
PA=1
PORT=0x378 [or other
address]
COMMAND_PORT=19501
STATUS_PORT=19502
/repos_sdr_linux/sdr1000/build/linux/./sdr1000
--rfe --pa &
Options that can be added for changing the
parameters for sdr1000 include:
--verbose
-v
Turn
on Verbose mode
--usb
-u
SDR1000 via USB
--rfe
-r
SDR1000
has rfe
--pa
-p
SDR1000 has
pa
--command-port=<portnum>
-c=<portnum>
Use
port <portnum> for
commands
--status-port=<portnum>
-s=<portnum>
Use
port <portnum> for sending
status
--parallel-port=<address>
-l=<address>
Use
address <address> for SDR1000 parallel port
10. If your printer port address is other than 0x378 and you didn't change the default in #8 above, then add --parallel-port=0x8400 or whatever your printer port address is before the ampersand in the last line above.
10. After SDR-Java is running, add the appropriate SDR-1000 widgets to the GUI [see illustration above].
5.
Download Edson Pereira PU1JTE/N1VTN's sdr-shell GUI [updated
2/8/2009]
First we will describe how to do this using svn:
create a directory /sdr-shell-v2 and then cd there and type:
svn checkout http://sdr-shell.googlecode.com/svn/branches/sdr-shell-v2
The
../bin subdirectories will have already-compiled versions of the
DttSP elements and sdr-shell, so you don't need to compile unless
there are problems.
If you DO need to compile, then
type:
qmake sdr-shell.pro -o Makefile
make
and you should
have a working version of sdr-shell. Copy the executable file to a
/bin directory by typing:
cp sdr-shell
/usr/local/bin/sdr-shell
To get sdr-shell to compile, I had to
add to main_widget.cpp the following: #include <stdlib.h>. Try
first without making this change and only add it if your compilation
fails.
There is more information on SDR-Shell
at:
http://ewpereira.info/sdr-shell/
If you prefer, you may download a tarball that includes dttsp-r38 as well as sdr shell [both of these are from vintage 2006] from:
http://ewpereira.info/sdr-shell/sdr.20060825.tar.gz
If you use the tarball, your directory structure will be different.
Put the tar.gz file in the directory /usr/local and type:
tar zxvf sdr.20060815.tar.gz or whatever the current filename is.
This will
create the directory: usr/local/sdr and its
subdirectories:
...dttsp
...dttsp-r38
...sdr-shell
...sdr-shell-v2a
Again,
the ../bin subdirectories will have already-compiled versions of the
DttSP elements and sdr-shell, so you don't need to compile unless
there are problems. If you need to compile, sdr-shell-v2a will
compile in the same way as noted above. However, the procedure for
DttSP is different than outlined above for the svn dttsp files. Go to
the directory ../dttsp-r38/src and type:
make staticlib
make
make
install
If you get an error when you try to run sdr-shell that looks like:
sdr-shell:
error while loading shared libraries: libqt-mt.so.3: cannot open
shared object file: No such file or directory
then you likely
need to make a link from the location of the following files:
libqt-mt.so.3
libqt-mt.so.3.3 libqt-mt.so.3.3.8
to the directory
/usr/local/lib.
Here is the script I use to use the new [2-21-2009] version of SDR-Shell-V2 with the new version of dttsp from the svn site noted above. It is modified from the original by Edson Pereira and Andrea Montefusco: sdr-shell.sh
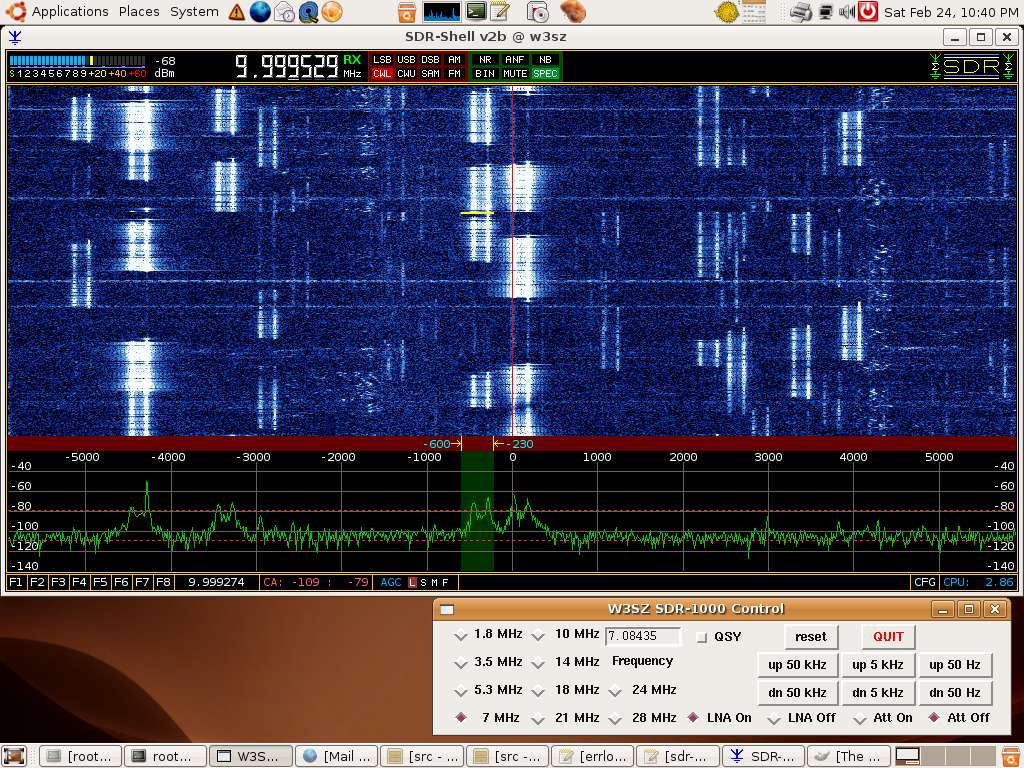
6.
Start sdr-core with Edson's script
To
start the sdr by automatically starting jackd, dttsp [sdr-core] and
sdr-shell by using Edson's script, type from the directory where
sdr-shell.sh resides::
./sdr-shell.sh start
# To stop the sdr [again using the script], type:
./sdr.shell.sh stop
# type export SDR_DEFRATE=48000 to set this environmental variable if sdr-shell doesn't want to start because this environmental variable is missing.
6a. Modifying Edson's SDR-Shell to work with the HPSDR Mercury
I wanted
to see if I understood things well enough to adapt Edson Pereira's
SDR-Shell to work with the HPSDR Mercury. It really was not a
lot of work, just taking a few small changes. The DttSP
[sdr-core] udp sockets were connected to the fifos using socat and
Frank Brickle's passport. DttSP communicates with SDR_Shell
using ports 19001 [command], 19002 [spectrum], and 19003 [meter].
SDR-Shell communicates with Ozy via John Melton's Ozy driver and port
19601.
There is a tar.gz file with the files you need at:
sdrshell_merc_w3sz.tar.bz2
or you can review the latest code on Google Code at:
http://code.google.com/p/sdr-shell/source/browse/#svn/branches/w3sz
and download it
from the svn repository on Google Code at:
http://sdr-shell.googlecode.com/svn/branches/w3sz
.
Iwould suggest that you leave these files in the /sdrshell/ directory; then the sdrpipes script will need less modification to work for you. This script is located in the directory /sdrshell/w3sz, as is the script killsdr.
The script sdrpipes will get everything running once you have it configured correctly for your particular installation.
First it sets up the fifos. Then it creates the pipes for the spectrum and the meter. Next it initializes Ozy, then it starts jackd, then it starts sdr-core. Then it starts the Ozy driver. Then it sets up the jack connections to the SDR. After that, it sets up the pipe for the command port to the SDR-Shell software. Finally, it sets up the pipe for SDR-Shell to communicate with the Mercury hardware and then it starts SDR-Shell.
Only two files in the SDR-Shell source required modification. They were main_widget.cpp and main_widget.h I marked my additions and deletions to the files with 'w3sz'. You can search on w3sz to see what I changed. It wasn't much.
To compile SDR-Shell itself, you just need to do a 'make clean' followed by a 'qmake' followed by a 'make' in the /sdrshell/ directory. You may get a bunch of warnings, but there should be no fatal errors.
The programs that initialize Ozy are contained in the directory /sdrshell/OzyJanus-Jack/ and you compile them if necessary from that directory with 'make' and 'make install'.
The ozy driver is in the directory /sdrshell/N6LYT/ozy/ and in /sdrshell/N6LYT/ozy/dist/Release/GNU-Linux-x86. You may need to compile it [from the former directory, using the command 'make'].
The file
'killsdr' is just a script that cleans up any stray instances of
various processes that tend to accumulate when I am playing with the
sdr. I run it a few times between software experiments to make
sure everything is 'at baseline'.
If the Jack
connections are not what you need, you can change the script or use
Qjackctl to change them.
When you start SDR-Shell, you should
configure it by clicking on the 'Cfg' box in the lower right-hand
corner. On the 'General' configuration page that pops up when
you click on this box, set the "LO Frequency" to a
frequency on the band you want to listen to, e.g. 7100000. On
The 'Spectrum' configuration page, set the "Spectrum Type"
to "Pre-Filter". On the IF configuration page, do NOT
select either of the following bottons: "Use Hamlib",
"Use IF Mode". Set the "IF Frequencies" to
zero ["0"]. Then close the configuration box.
You
can enter frequencies into the memory bozes at the lower left by
right-clicking on a box when you are on the desired frequency.
Left-clicking on the box will restore the memorized frequency.
You can go to a signal seen on either the waterfall or the bandscope
by clicking on it. You can change frequency in steps by using
the right and left arrows. You can increase or decrease the
step size by using the up or down arrows. You can change the
filter width for each mode by left clicking [to set the lower filter
limit] and right clicking [to set the upper filter limit] on the
brown bar between the waterfall and the spectrum.
I added a
function to SDR-Shell allow you to turn the Mercury preamp on and
off. Typing "." [the period punctuation mark, which
is on the same key as ">"] turns the preamp on, and
typing "," [the comma punctuation mark, which is on the
same key as "<"] turns the preamp off. I also
added a function for Alt-h, which now brings up the configuration
menus and the help text. I turned on both random and dither for
Mercury, and did not make those user-controllable options, although
that would be simple to add.
Thus far I have only tried
Mercury and SDR-Shell with a 48kHz sampling rate. It works well
and is more stable [longer time to first crash] than the other
alternatives available for Linux at this time, likely due to lower
overhead.
Below is the terminal output I see when things start
successfully. The 'error' messages are of no
consequence.
root@w3sz-desktop:/hpsdr/trunk/OzyJanus-Jack#
sdrpipes
usb_find_busses returned: 5
usb_find_devices returned:
9
ResetCPU(true).......returns 1
HPSDR_UploadFirmware:
Processed 741
lines.
UploadFirmware('/usr/local/ozy/ozyfw-sdr1k.hex')......returns
741
ResetCPU(false).......returns 1
usb_find_busses returned:
5
usb_find_devices returned: 9
96654 bytes
transferred.
LoadFPGA succeeded!
usb_find_busses returned:
5
usb_find_devices returned: 9
***** Write to I2C Failed
***** I2C Bytes written = 0
usb_find_busses returned:
5
usb_find_devices returned: 9
***** Write to I2C Failed
***** I2C Bytes written = 0
usb_find_busses returned:
5
usb_find_devices returned: 9
***** Write to I2C Failed
***** I2C Bytes written = 0
usb_find_busses returned:
5
usb_find_devices returned: 9
***** Write to I2C Failed
***** I2C Bytes written = 0
usb_find_busses returned:
5
usb_find_devices returned: 9
***** Write to I2C Failed
***** I2C Bytes written = 0
usb_find_busses returned:
5
usb_find_devices returned: 9
***** Write to I2C Failed
***** I2C Bytes written = 0
usb_find_busses returned:
5
usb_find_devices returned: 9
***** Write to I2C Failed
***** I2C Bytes written = 0
usb_find_busses returned:
5
usb_find_devices returned: 9
***** Write to I2C Failed
***** I2C Bytes written = 0
usb_find_busses returned:
5
usb_find_devices returned: 9
***** Write to I2C Failed
***** I2C Bytes written = 0
usb_find_busses returned:
5
usb_find_devices returned: 9
***** Write to I2C Failed
***** I2C Bytes written = 0
usb_find_busses returned:
5
usb_find_devices returned: 9
***** Write to I2C Failed
***** I2C Bytes written = 0
usb_find_busses returned:
5
usb_find_devices returned: 9
***** Write to I2C Failed
***** I2C Bytes written = 0
usb_find_busses returned:
5
usb_find_devices returned: 9
***** Write to I2C Failed
***** I2C Bytes written = 0
usb_find_busses returned:
5
usb_find_devices returned: 9
***** Write to I2C Failed
***** I2C Bytes written = 0
starting jackd ...
no message
buffer overruns
jackd 0.116.2
Copyright 2001-2005 Paul Davis
and others.
jackd comes with ABSOLUTELY NO WARRANTY
This is
free software, and you are welcome to redistribute it
under
certain conditions; see the file COPYING for details
JACK
compiled with System V SHM support.
loading driver ..
apparent
rate = 48000
creating alsa driver ...
hw:0|hw:0|512|3|48000|0|0|nomon|swmeter|-|32bit
control device
hw:0
configuring for 48000Hz, period = 512 frames (10.7 ms),
buffer = 3 periods
ALSA: final selected sample format for capture:
32bit integer little-endian
ALSA: use 3 periods for capture
ALSA:
final selected sample format for playback: 32bit integer
little-endian
ALSA: use 3 periods for playback
starting DttSP
MERC_RX ...
connecting Mercury Alsa receiver ...
ERROR
ozy:rx_in_l not a valid port
ERROR ozy:rx_in_r not a valid
port
creating pipe 19001 for SDR Receiver
new_ozy_ringbuffer:
34816
creating pipe 19601 for Mercury and starting
sdr-shell
root@w3sz-desktop:/hpsdr/trunk/OzyJanus-Jack#
sample_rate = 48000
::: Unable to get SDR_PARMPATH environment
variable.
Using default: /dev/shm/SDRcommands
::: Unable to get
SDR_METERPATH environment variable.
Using default:
/dev/shm/SDRmeter
::: Unable to get SDR_SPECPATH environment
variable.
Using default: /dev/shm/SDRspectrum
::: Configuration
loading completed
Adjusting font... Ascent 18
Adjusting font...
Ascent 18
Adjusting font... Ascent 16
Adjusting font... Ascent
15
Adjusting font... Ascent 14
Adjusting font... Ascent 12
:::
Memory Cells loading completed
Mode is 128
----------------------
It is currently normal to get
ringbuffer error messages as follows while Ozy is
running:
jack_ringbuffer_get: buffer=7916 wanted 512 got
496
jack_ringbuffer_get: buffer=7917 wanted 512 got
504
jack_ringbuffer_get: buffer=7954 wanted 512 got
468
jack_ringbuffer_get: buffer=7977 wanted 512 got
76
jack_ringbuffer_get: buffer=7978 wanted 512 got
441
jack_ringbuffer_get: buffer=7979 wanted 512 got
504
jack_ringbuffer_get: buffer=7980 wanted 512 got 441
Note
that I have thus far used Windows tools to update the firmware in
Mercury. The software you need to do this is in the svn at:
svn://206.216.146.154/svn/repos_sdr_hpsdr/trunk/USBBlaster-Binaries
7. Getting Bob Cowdery's Acorn working under Ubuntu Linux [Updated 3/9/2009]
Bob
has done a great job with instructions on how to get Acorn up and
running. They are obtained from his webpages and wiki at
Google-code:
http://code.google.com/p/acorn-sdr/
The
wiki has
information on installing pre-requisites for Acorn, Installing and
Running Acorn, and on setting it up to run with the HPSDR receiver
Mercury.
The only additions I have to the instructions are
that [1] it is necessary to have
pyjack installed and [2] if you are using a 64 bit kernel you
will need to make your own version of
../acorn-sdr/src/ozydrv/Release/libozydrv.so.
This file also needs to go in the ../acorn-sdr/src/ozydrv/hpsdr
directory. I put a version of the file here.
You can make your own by going to
../acorn-sdr/src/ozydrv/Release/subdir.mk and adding -fPIC to the
invocation of gcc, as here:
gcc -I/usr/include/python2.5 -O3
-fPIC
-Wall -c
-fmessage-length=0 -MMD -MP -MF"$(@:%.o=%.d)"
-MT"$(@:%.o=%.d)" -o"$@" "$<"
and
then after saving that, doing "make clean" and "make"
in the directory ../acorn-sdr/src/ozydrv/Release. The library
libozydrv.so is compiled using the libusb-0.1 library, as compiling
it using the newer libusb-1.0
library causes acorn to give an error:
Traceback (most recent
call last):
File "hpsdr/ozy_service.py", line 43, in
<module>
import ozy
File "/acorn-sdr/src/hpsdr/ozy.py",
line 41, in <module>
import libozydrv as usb
ImportError:
/acorn-sdr/src/hpsdr/libozydrv.so: undefined symbol:
usb_release_interface
even though libozydrv.so version 1.0
DOES contain usb_release_interface:
grep
"usb_release_interface" /usr/lib/libusb*
Binary file
/usr/lib/libusb-1.0.a matches
Binary file /usr/lib/libusb-1.0.so
matches
Binary file /usr/lib/libusb-1.0.so.0 matches.
ldd
for libusb-1.0 gives:
ldd
/usr/lib/libusb-1.0.so
linux-vdso.so.1 =>
(0x00007fffd99ff000)
librt.so.1 => /lib/librt.so.1
(0x00007f47d148e000)
libpthread.so.0 => /lib/libpthread.so.0
(0x00007f47d1272000)
libc.so.6 => /lib/libc.so.6
(0x00007f47d0eff000)
/lib64/ld-linux-x86-64.so.2
(0x00007f47d18cd000)
ldd for libusb-0.1 gives:
ldd
/usr/lib/libusb.so
linux-vdso.so.1 =>
(0x00007fff587fe000)
libc.so.6 => /lib/libc.so.6
(0x00007f725009f000)
/lib64/ld-linux-x86-64.so.2
(0x00007f7250644000)
It may be that the pthread and rt
[realtime] capabilities of libusb-1.0 cause the incompatibiliy with
acorn.
It
turned out to be pretty easy to
get Acorn to work across
the network...As
I type this i am listening to a local AM station being received on
1240 KHz by my SDR-1000 that is connected to my laptop, and the GUI
and audio are coming from my desktop, which is receiving the signal
from the laptop over the local network. The audio sounds
perfect!
You need to start the 'local' machine process before
you start the 'remote' or server machine process, or the server will
shut down. Jack for both machines must be set to 48000 kHz sampling
rate; -p512 is the other critical jackd parameter.
On the
'local' machine [that I would call the client] that has IP address
192.168.1.103, that has no radio hardware, and uses alsa for audio, I
run run_acorn_local.sh:
#! /bin/bash
jackd -d alsa -d hw:0
-r 48000 -p 512 -n 5&
#jackd -d firewire -d hw:0 -r 48000 -p
512 -n 5&
sleep 5
qjackctl &
sleep 5
cd
/acorn-sdr/conf/ice
icebox --Ice.Config=config.icebox&
sleep
2
cd /acorn-sdr/src
python persistance/persist_service.py
../conf/ice/acorn_ice_local.config&
sleep 1
python
outstr/outstr_service.py ../conf/ice/acorn_ice_local.config&
sleep
3
python dsp/dsp_service.py
../conf/ice/acorn_ice_local.config&
sleep 1
python
console/app_main_gui.py
../conf/ice/acorn_ice_local.config&
-------------------------------------------------------------------
This
local radioless machine uses config file
../conf/ice/acorn_ice_local.config that looks like this:
#
#
This property is used to configure the endpoints of the command
#
subscriber
adapter.
#
Update.Subscriber.Endpoints=tcp:udp
Command.Subscriber.Endpoints=tcp:udp
StreamCmd.Subscriber.Endpoints=tcp:udp
Dsp.Subscriber.Endpoints=tcp:udp
StreamIn.Proxy=streamin:default
-p 9990 -h 192.168.1.103
StreamIn.Endpoints=default -p 9990 -h
192.168.1.103
StreamOut.Proxy=streamout:default -p 9991 -h
127.0.0.1
StreamOut.Endpoints=default -p 9991 -h
127.0.0.1
Persist.Proxy=persist:default -p 9992 -h
192.168.1.103
Persist.Endpoints=default -p 9992 -h
192.168.1.103
#
# Disable client-side
ACM.
#
Ice.ACM.Client=0
#
# Warn about connection
exceptions
#
Ice.Warn.Connections=1
#
# This property
is used by the clients to connect to
IceStorm.
#
TopicManager.Proxy=AcornIceStorm/TopicManager:default
-p 10000 -h 192.168.1.103
#
# Network Tracing
#
# 0 =
no network tracing
# 1 = trace connection establishment and
closure
# 2 = like 1, but more detailed
# 3 = like 2, but also
trace data
transfer
#
#Ice.Trace.Network=1
----------------------------------------------------------------------------
In
Qjackctl I feed the output of acornout:out_1 and acornout:out_2 to
system:playback1 and system:playback1 respectively. There is no input
via Jack to
acornout: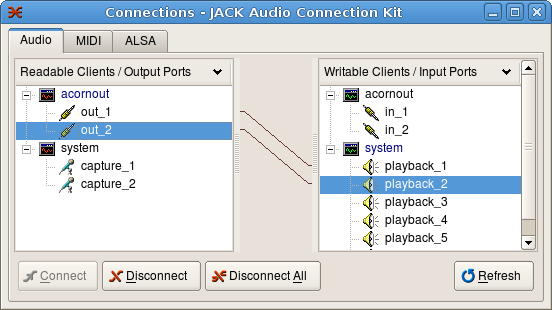
----------------------------------------------------------------------------
----------------------------------------------------------------------------
On
the remote machine with the radio hardware [what I would call the
server] that has IP address 192.168.1.227 and uses firewire with a
Presonus Firebox and is connected to the SDR1000 I run
run_acorn_remote.sh:
#! /bin/bash
#jackd -d alsa -d hw:0 -r
48000 -p 512 -n 4&
jackd -R -P50 -d firewire -d hw:0 -r 48000
-p 512 -n4&
sleep 5
qjackctl &
sleep 5
cd
/acorn-sdr/src
python instr/instr_service.py
../conf/ice/acorn_ice_remote.config&
sleep 1
python
controller/hw_service.py
../conf/ice/acorn_ice_remote.config&
----------------------------------------------------------------------------
This
remote radio server machine uses config file
../conf/ice/acorn_ice_remote.config that looks like this:
#
#
This property is used to configure the endpoints of the command
#
subscriber
adapter.
#
Update.Subscriber.Endpoints=tcp:udp
Command.Subscriber.Endpoints=tcp:udp
StreamCmd.Subscriber.Endpoints=tcp:udp
Dsp.Subscriber.Endpoints=tcp:udp
StreamIn.Proxy=streamin:default
-p 9990 -h 192.168.1.103
StreamIn.Endpoints=default -p 9990 -h
192.168.1.103
StreamOut.Proxy=streamout:default -p 9991 -h
127.0.0.1
StreamOut.Endpoints=default -p 9991 -h
127.0.0.1
Persist.Proxy=persist:default -p 9992 -h
192.168.1.103
Persist.Endpoints=default -p 9992 -h
192.168.1.103
#
# Disable client-side
ACM.
#
Ice.ACM.Client=0
#
# Warn about connection
exceptions
#
Ice.Warn.Connections=1
#
# This property
is used by the clients to connect to
IceStorm.
#
TopicManager.Proxy=AcornIceStorm/TopicManager:default
-p 10000 -h 192.168.1.103
#
# Network Tracing
#
# 0 =
no network tracing
# 1 = trace connection establishment and
closure
# 2 = like 1, but more detailed
# 3 = like 2, but also
trace data
transfer
#
#Ice.Trace.Network=1
----------------------------------------------------------------------------
On
this remote radio server, using Qjackctl I feed the output of
system:capture_3 and system:capture_4 to acornin:in_1 and
acornin:in_2 respectively. There is no connection to acornin or
system:playback: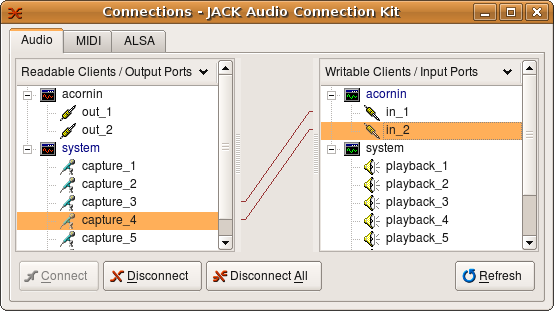
To
summarize the setup, you need to have the IP address of the local
[client] machine in the config file of both machines. You don't put
the IP address of the radio hardware/remote/server machine anywhere.
ICE takes care of connecting the machines together. I found the most
common cause of an error message when starting up was an incorrect IP
address in one of the config files. A close second was forgetting to
have jackd set to start with -p512, or forgetting to delete the
acorn.db files when first setting things up and therefore getting
incompatible parameters used during initialization.
The
frequency control digits will initially appear in a small font and
black color, suggesting that the controller is not working. Just move
your scroll mouse over the digits and use the scroll wheel and the
display should spring to life with larger, red digits and you are in
business.
There is a memory leak in the ozy driver that causes
the system to slow considerably after acorn has been running for a
while. That is NOT a problem when acorn is used with the
SDR1000.
Note that I have thus far used Windows tools to
update the firmware in Mercury. The software you need to do
this is in the svn at:
svn://206.216.146.154/svn/repos_sdr_hpsdr/trunk/USBBlaster-Binaries
8. How to get SDR-1000 Hardware Control working under Ubuntu Linux [Updated 2-11-2009]
The available SDR1000 control commands can be found in the file 'hw_sdr1000.h' which is part of the download. I have not tried to transmit yet using this interface, but have tested and found that the following commands work:
StandBy() Puts the SDR-1000 in standby mode. No contents within ().
PowerOn() Puts the SDR-1000 in operate mode. No contents within ().
SetFreq() Sets the DDS and filters for desired frequency expressed as (w.xyz) MHz
SetBPF() Sets the BPF filter frequency, expressed as (w.xyz) MHz. SetFreq takes care of this.
SetLPF() Sets the LPF filter frequency, expressed as (w.xyz) MHz. SetFreq takes care of this.
SetINAOn() Turns the LNA On (False) or Off (True).
SetATTOn() Turns the Attenuator On (True) or Off (False).
SetXVTR_RF() Switches the RF path to the transverter port (True) or away from it (False).
Create a directory /usr/sdrhw [mkdir /usr/sdrhw].
Then get the download via svn by typing : svn co svn://206.216.146.154/svn/repos_sdr_linux/trunk . This will create a directory /usr/sdrhw/trunk that contains dttsp, hardware libraries, test code, and swig for linux, cygwin, and visual studio 2005.
Copy the trunk directory to a directory for the current repository by typing: cp -r trunk sdrhw-r90 [or whatever the version number is].
Then create a symbolic link by typing: 'rm sdrhw' and then 'ln -s sdrhw-r90 [or whatever your version number is] sdrhw'. This way you can set up all of your scripts so that they use the directory /usr/sdrhw/sdrhw and you won't need to change them when you get new versions of the software; you will just need to delete and re-create the link by typing from the directory /usr/sdrhw 'rm sdrhw' and then 'ln -s sdrhw-r91 [or whatever] sdrhw' after you do the svn download and copy the trunk directory to a new directory sdrhw-r91 [or whatever] as above.
Note that there are certain pre-requisite files or 'dependencies' that you will need to compile dttsp and the SDR-1000 control software. I listed what is necessary for dttsp in section 2, above. You will of course need python, python2.5-dev, swig, the libusb packages and possibly some other files [e.g. doxygen] in addition. To get these files do the following:
To
get python: 'apt-get install python' [add sudo at the beginning if
not root]
To get python2.5-dev: 'apt-get install python2.5-dev'
[add sudo at the beginning if not root]
To get swig: 'apt=get
install swig' [add sudo at the beginning if not root]
To get
doxygen: 'apt=get install doxygen' [add sudo at the beginning if not
root]
To get libusb:
'apt-get install libusb-0.1-4
libusb-dev'
To
compile all of the software you have downloaded from the svn
repository, make sure you are in the /usr/sdrhw/sdrhw/dttsp/src
directory and type './configure' without the quotes, and then type
'make' without the quotes and then 'make install' without the quotes
[this last one may be unnecessary]. To compile the SDR-1000 hardware
control software go to /usr/sdrhw/sdrhw/hardware/sdr1000/build/linux
and type 'make' and 'make -f swig.mk' and the hardware control
software will be installed. Then type './hwtest' to start the SDR1000
using the compiled C++ test program. You can modify ../hw_test.cpp to
set things up as you like. For the make commands, if you are not root
you will need to type 'sudo make' instead of 'make' each time.
to
get the SDR1000 control software to compile without error, I had to
change line 10 of the file :
../hardware/sdr1000/test/hw_test.cpp:
int main(int argc, char*
argv)
to:
int main(int argc, char** argv)
The easiest way to control the hardware is to either use the GUI I describe below, or to run things interactively from python. There are two ways to do the latter, either from the command line in your terminal window after invoking python, or with IDLE:
[IDLE - an Integrated DeveLopment Environment for Python ]. The Idle shell adds some convenience to playing with python, but when not using my GUI described below, I tend to just run 'python' from the command line and so I describe the python command-line method here.
In
order to control the SDR-1000 via the parallel port, you need to know
the parallel port address. You can find the address assignments by
typing at the command prompt:
cat /proc/ioports
This
will give you a long listing that will include some lines
like:
8000-8007 : 0000:01:01.0
8000-8002 : parport1
8080-8087 : 0000:01:01.0
8400-8407 : 0000:01:01.0
8400-8402
: parport0
The address of parport1 is 8000, and that of parport2
is 8400.
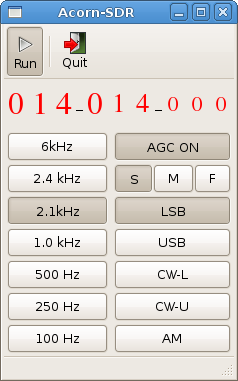
Here
is a little widget tktest.py
that will start
the SDR-1000 and let you move its frequency up and down by 250 kHz,
50 kHz, 5 kHz or 50 Hz [that is all you need with a GUI and
waterfall] or type in a frequency of your choice, change bands,
separately activate or deactivate the LNA and attenuator, or reset
the unit. Put it in
your
/usr/sdrhw/sdrhw/hardware/sdr1000/build/linux directory. When
it starts up it will center the SDR-1000 on approximately 7.050 MHz.
It assumes that your parallel port 0x378 is being used to control the
SDR-1000. To run it just type: 'python tktest.py'. Here is an image
of the GUI:

To
select a band, just click on the 'RadioButton' for the band you want
and the SDR-1000 will go to the last frequency you used on that band,
or to the default frequency in the sdrini file if you haven't used
that band before. Clicking on the 'up 5 kHz' or 'down 5 kHz' button
moves the SDR-1000 up or down 5 kHz, respectively. Since my SDR-Shell
waterfall is set to show a bit more than 5 kHz either side of center,
this works well for tuning up or down the bands. Clicking on the 'up
50 Hz' or 'down 50 Hz' buttons of course moves the SDR-1000 up or
down 50 Hz. This is good for 'fine-tuning' a station after you've
clicked on it in the SDR-Shell to bring it into the filter passband,
and is much more convenient that trying to fine tune by clicking the
mouse.
The 'reset' button resets the SDR-1000 by reading in the defaults from the sdrini file, and doing a 'power-on' to the SDR-1000. The 'LNA On' and 'LNA Off' buttons turn on and off the LNA. The 'Att On' and 'Att Off' do the same for the attenuator.
You can type a frequency into the text window above the 'Frequency' label if you want. When you click on the 'QSY' button it will send that frequency to the SDR and you can tune from there using the up and down 5 and 50 buttons. If you try to enter a frequency below 12 kHz or above 60 MHz, the widget won't accept it. If you hit the 'Enter' key while the focus is on the frequency textbox, the frequency will be erased and not entered. So avoid hitting 'Enter' after you have entered a frequency; click on the 'QSY' button instead.
Clicking on the 'QUIT' button closes the widget. Please let me know if this widget is or is not useful for you, and report any problems that occur with it.
You need to set it up for the proper address for your parallel port connection to the SDR-1000. As noted above, you can use the command cat /proc/ioports to find your parallel port address. Then find the line "sdr = SDR1000('test', True, True, False, 0x378) in the file and change 0x378 to your parallel port address. For me that address is 0x8400.
If for some strange reason you prefer to input commands to the SDR-1000 manually line by line from python rather than using the GUI, then run python from the command line, from the /usr/sdrhw/sdrhw/hardware/sdr1000/build/linux directory. Type:
>python
>>>import sys
>>>from sdr1khw import *
>>>sdr = SDR1000('test', True, True, False, 0x8400) [if your parport address is 8400]
>>>sdr.PowerOn()
>>>sdr.SetFreq(7.05 - 0.11025)
and the SDR will be set up to receive around 7.05 MHz. To get out of python when you are done playing, type "ctl-d". IDLE works similarly...just type 'idle' from within the ../build/linux directory instead of typing 'python' to start and then proceed as above.
The IDLE interface looks like this:

To keep from having to type all of the above every time you want to run the SDR1000, you can make up and put in the ../build/linux directory a python script hw_test.py that includes the following text:
----------------------------
#! /usr/bin/env python
import sys
from sdr1khw import *
sdr = SDR1000('test', True, True, False, 0x378)
sdr.PowerOn()
sdr.SetFreq(7.05 - 0.11025)
try:
sys.stdin.read()
except KeyboardInterrupt:
pass
----------------------------
And then when you want to control the SDR1000 just type:
>python [or idle]
>>>execfile("hw_test.py")
>>>ctl-C [to get back to the python '>>>' prompt]
>>>sdr.SetFreq(14.025) to change to another frequency, and so on.
In order to use the SDR-1000, in addition to having the SDR1000 hardware running, you need to have the DSP software [DttSP] running. Assuming that you have set DttSP up as shown earlier on this webpage, open another terminal shell and type 'sdr start' and 'sdr-shell &' to start receiving. Note that if you your setup is like mine you will need to add setup_env to the /usr/local/bin directory for things to work properly. You will need to make sure that the script 'sdr' points to the right directory for your new dttsp files; for me, that is also /usr/local/bin.
9. Get Presonus Firebox Working with Ubuntu Linux [updated 2-13-2009]
With
Ubuntu 8.10, getting the Presonus Firebox to work properly under
Ubuntu Linux is easy! Some of you like me may want to use the Firebox
with your SDR-1000 under Linux, so I give some details of what I did
here. On my first try, I installed Freebob, but this has been
replaced by FFADO, and so I redid the installation to use FFADO, as I
found I needed FFADO for the new DttSP to work properly. I would
therefore recommend skipping section [A], and go right to section
[B].
A. Using Freebob [I
recommend skipping this section]
Getting
this to work involves installing FreeBob, making and running a
modified sdr-shell.sh file, and changing SND_DRIV in
/usr/dttsp/sdr/dttsp/bin/setup_env to "freebob".
1.
apt-get update
2. apt-get install jackd qjackctl
3. apt-get
install libfreebob0 libfreebob0-dev
After doing the above, type 'jackd -d freebob' and jackd should start and the blue light come on on the Firebox indicating that all is well. This is a good quick check on whether or not things have gone well for you. If the blue light does not come on, they have not. I am able to start jackd either using my modified sdr.sh file [see below], or by using qjackctl. If I use qjackctl then I need to start sdr-core using a differently-modified sdr-shell.sh [that has the jackd-related stuff removed]. In either case after jack and sdr-core are started I run sdr-shell as usual, and see and hear output from the SDR-1000 just as if I was using the Delta44 or another soundcard. The only issue of which I am aware is that when I start and stop things via sdr.sh, the 1394 link does not get reset properly and I have to unplug and replug the firewire physical cable to get things to work the next time I type sdr start. If I use qjackctl, all the connections are properly terminated and then restarted when requested, and I don't need to do this. ;)
Here is what I see when I run my modified sdr.sh:
root@w3sz-laptop:/usr/dttsp/sdr#
sdr start
> Starting jack...
> freebob
starting
Succeeded. JackD PID is 9518
jackd 0.102.10
Copyright
2001-2005 Paul Davis and others.
jackd comes with ABSOLUTELY NO
WARRANTY
This is free software, and you are welcome to
redistribute it
under certain conditions; see the file COPYING for
details
JACK
compiled with System V SHM support.
loading driver ..
Freebob
using Firewire port 0, node -1
> Starting dttsp...
Succeeded.
DttSP PID is 9523
> Connecting dttsp to FireBox
safemem
75688
ALSA lib seq_hw.c:457:(snd_seq_hw_open) open /dev/snd/seq
failed: No such file or directory
FreeBoB ERR: Error opening ALSA
sequencer.
FreeBoB ERR:
-----------------------------------------------------------
FreeBoB
ERR: Error creating midi device!
FreeBoB ERR: FreeBob will run
without MIDI support.
FreeBoB ERR: Consult the above error
messages to solve the problem.
FreeBoB ERR:
-----------------------------------------------------------
libiec61883
warning: Established connection on channel 0.
You may need to
manually set the channel on the receiving node.
libiec61883
warning: Established connection on channel 1.
You may need to
manually set the channel on the transmitting node.
sdr-9523:ol ->
freebob_pcm:dev1p_MainOut 1+2 left
engine sample rate:
48000
sdr-9523:or -> freebob_pcm:dev1p_MainOut 1+2 right
engine
sample rate: 48000
freebob_pcm:dev1c_LineIn 3+4 left ->
sdr-9523:il
engine sample rate: 48000
freebob_pcm:dev1c_LineIn
3+4 right -> sdr-9523:ir
engine sample rate:
48000
root@w3sz-laptop:/usr/dttsp/sdr#
---end of screens from
sdr start start-up.
My versions are:
# uname -a Linux
w3sz-laptop 2.6.15-26-386 #1 PREEMPT Fri Sep 8 19:55:17 UTC 2006 i686
GNU/Linux
# jackd -V
jackd version 0.102.10 tmpdir /dev/shm
protocol 16
I used svn for libiec61883 and debian versions of
the other firewire packages.
My output for jack_lsp is:
#
jack_lsp
sdr-9746:il
sdr-9746:ir
sdr-9746:ol
sdr-9746:or
sdr-9746:al
sdr-9746:ar
sdr-9746:tl
sdr-9746:tr
freebob_pcm:dev1c_Mic/InstIn
1+2 left
freebob_pcm:dev1c_Mic/InstIn 1+2
right
freebob_pcm:dev1c_LineIn 3+4 left
freebob_pcm:dev1c_LineIn
3+4 right
freebob_pcm:dev1c_SpdifIn left
freebob_pcm:dev1c_SpdifIn
right
freebob_pcm:dev1p_MainOut 1+2 left
freebob_pcm:dev1p_MainOut
1+2 right
freebob_pcm:dev1p_LineOut 3+4
left
freebob_pcm:dev1p_LineOut 3+4 right
freebob_pcm:dev1p_LineOut
5+6 left
freebob_pcm:dev1p_LineOut 5+6
right
freebob_pcm:dev1p_SpdifOut left
freebob_pcm:dev1p_SpdifOut
right
root@w3sz-laptop:/usr/dttsp/sdr#
Finally, here is my
version of Edson's sdr.sh, modified to work with
FireBox:
sdrfirebox.sh
B. Using Presonus Firebox with FFADO
You need to install libffado, as detailed above. You do NOT need freebob. Once you have libffado installed, you are ready to go. If you are using John Melton's Java-SDR, go to here to see how to set things up. If you are using Edson Pereira's SDR-Shell, go to here and here and use sdr-shell.sh to start things running.
10. How to get DttSP PortAudio version working under Ubuntu Linux [Dapper]
[This was last updated on March 25, 2007]. The PortAudio version of DttSP is still in a state of flux, under construction by Bob and Frank. The notes below apply to my system and may not work on yours. I started with my system in the state created by applying the suggestions noted above.
I downloaded and am using: versions 0.101.1-2.1 of jackd, libjack, and libjack-dev [0.100.0 of jackd also works]. libasound-plugins is v. 1.0.10-1 and libjackasyn0 is v. 0.11-2ubuntu2. qjackctl is v. 0.2.21-1. Other versions may well work, but I cannot vouch for them. If you are not sure where to get these files, then you definitely should not be considering following this recipe. The links for getting these files are omitted for your protection!
To get PortAudio to work with DttSP I had to remove some Ubuntu Library files. I did this using Synaptic, but you could also do it using apt-get. Doing this resulted in the removal of OpenOffice and also the ubuntu-desktop metafile. I removed libportaudio0 and libportaudio-dev, both of which were Ubuntu-version files.
I am using the svn version of PortAudio. This is currently #1182. You can obtain it by typing:
svn co https://www.portaudio.com/repos/portaudio/branches/v19-devel
I set up a directory /usr/portaudio that is my 'working' directory for portaudio projects, and I made sure I was in that directory "cd /usr/portaudio" before typing this command.
Then I typed "cd v19-devel" and then "./configure" and then "make" and then "make install"
Then type "ldconfig" and then "export LD_LIBRARY_PATH=usr/local/lib". You will need to set LD_LIBRARY_PATH to this value as an environmental variable each time you try to run the DttSP version of PortAudio after rebooting. I do this by running a script each time I start qjackctl, as will be explained below. For some reason the way I set this in /etc/environment and /etc/profile didn't do the trick.
I had to make symbolic links to some library files to get things to work. Do this only if you get errors that indicate the need to do this [i.e., error messages that indicate the library file in question is 'missing']:
ln -s /usr/local/lib/libportaudio.so.2.0.0 /usr/local/lib/libportaudio.so.2
ln -s /usr/local/lib/libportaudio.so.2.0.0 /usr/local/lib/libportaudio.so.0
ln -s /usr/local/lib/libportaudio.so.2.0.0 /usr/local/lib/libportaudio.so
Again, I emphasize that I would recommend that you try doing the installation without these and only add them if needed, and then sequentially as noted.
Once you have PortAudio installed, you need to download and install dttsp-pa. I put this into a directory /usr/dttsp-save. Once that directory was created I typed "cd /usr/dttsp-save" and then
svn co svn://206.216.146.154/svn/repos_sdr_linux/branches/ab2kt/dttsp-pa
Then type "cd dttsp-pa/src" and then "./configure", "make", and "make install". Once you have done this, you can start qjackctl and then left-click on the "Start" button to start the jackd server. The Messages window will show you any errors. Bring up the Connect window if it is not already open by left-clicking on the "Connect" button:

Now I will describe what you need to do to set qjackctl and jack and PortAudio up to work with [1] Alsa or [2] Freebob jack backends.
1. To use the Alsa backend to jack with qjackctl and PortAudio, with the Delta44 soundcard as input and Intel HDA onboard sound as output:
First you need to click on the "Setup" button on qjackctl. This will bring up the screen below. Set the parameters as shown on the screen:
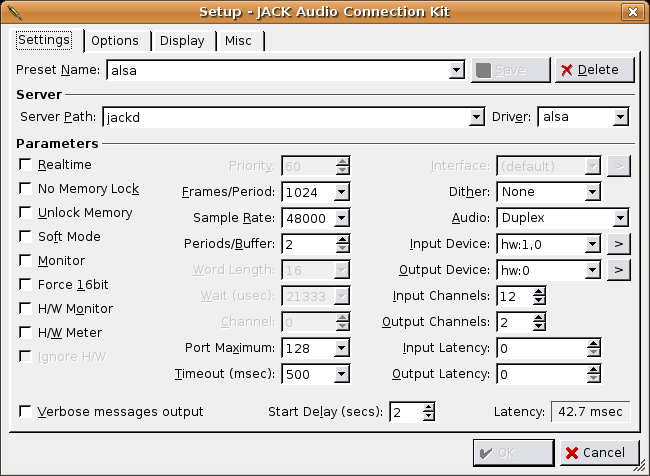
In particular, make sure you have the following parameters set as noted:
Driver:
alsa
Audio: Duplex
Input: hw:1,0 [ICE1712 Multi]
Output:
hw:0 [HDA Intel]
Input Channels: 12 [Values of 0 thru 8 don't
work; I didn't try 9,10,11. After discovering this for myself I found
a note on the web that indicates that Jack considers the Delta 44 to
be "12 and 10". I assume this means it considers the Delta
44 to have 12 input channels and 10 output channels.]
Output
Channels:2 [this specification is for the Intel HDA as it is being
used for output]
Frames/Period: 1024
Sample Rate: 48000
These parameters are specific to using the Delta44 as input and onboard Intel HDA sound as output.
Click on "Save" or "OK" to save these parameters. Now click on "Cancel" to get back to the main qjackctl GUI.
Click on "Start" to start the jack server. You should now see a window that looks like:
The device labels are some of those that you need to know to manually set things up to work with your particular soundcard, or to write a script to set things up. As long as you use qjackctl's GUI, it keeps track of things for you. At this point, you have not started DttSP, and so the DttSP devices are not visible.
Next you need to figure out what device number PortAudio is going to give the DttSP devices, so that you can set those parameters when you start DttSP [sdr-core]. With the jack server running, go to the /usr/portaudio/v19-devel/bin directory and type "./pa_devs". You will get a listing of device numbers generated by this PortAudio script. Using the Alsa sound driver and with a Delta44 soundcard and Intel HDA onboard sound, the pa_devs output showed as the last device:
--------------------------------------- device #7
[ Default JACK
Audio Connection Kit Input, Default JACK Audio Connection Kit Output
]
Name = alsa_pcm
Host API = JACK Audio Connection Kit
Max
inputs = 12, Max outputs = 2
Default low input latency =
0.021
Default low output latency = 0.021
Default high input
latency = 0.021
Default high output latency = 0.021
Default
sample rate = 48000.00
Supported standard sample rates for
half-duplex 16 bit 12 channel input = 48000.00
Supported standard
sample rates for half-duplex 16 bit 2 channel output =
48000.00
Supported standard sample rates for full-duplex 16 bit 12
channel input, 2 channel output = 48000.00
----------------------------------------------
so I knew that I needed to use device #7 for DttSP with PortAudio.
So, with qjackctl running and the jackd server invoked and the Connect GUI showing I next went to the directory /usr/dttsp-save/dttsp-pa/src and typed "./sdr-core --sndev-in=7 --sndev-out=7 -s -m" [note that you have to have already created the SDRcommands, SDRspectrum, and SDRmeter fifo's by this point; see above or look in the qjacksdr script]. This started sdr-core and after about 22 seconds the DttSP devices appeared in the Connect window which then looked like this:
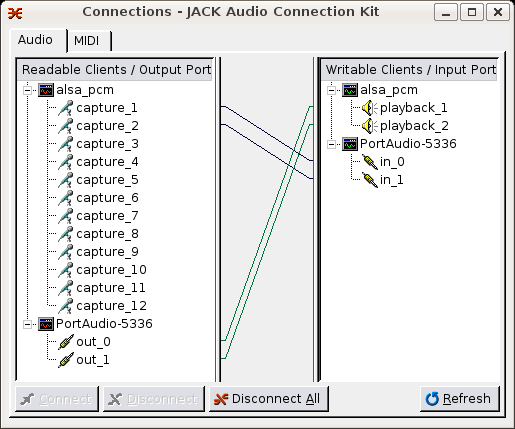
The GUI now shows also the PortAudio DttSP device labels needed: PortAudio-5336:out_0, PortAudio-5336:out_1, PortAudio-5336:in_0, and PortAudio-5336:in_1. The numerical designation is the PID and changes each time DttSP is run. The script below takes care of figuring out what it is so that you can automatically start DttSP, setup the connections properly, and start sdr-shell each time you start the jackd server from qjackctl.
Once all of the was done, I wrote a couple scripts, modified from Edson Pereira's sdr.sh script, to get everything setup automatically and started automatically each time the jackd server is started from within qjackctl. One of these scripts is invoked when the jackd server is started from qjackctl, and the other is invoked when the jackd server is stopped from qjackctl. The startup script is called qjacksdr and is here, and the stop script is called qjackctl-sdr-stop and is here. You set up qtackctl to use these by going to the "Options page" and setting it up as shown here:

Clicking on the "..." button will bring up a directory listing so you can select the desired script files. As noted above, you will need to modify qjacksdr to reflect your particular system environment and soundcard setup. You can figure out what soundcard settings to use by looking at the output of ../v19-devel/test/pa_devs and also by running qjackctl without the scripts and after you have DttSP-pa installed, running it by typing "./sdr-core --sndev-in=xxx --snd-dev-out=yyy -s -m" where xxx and yyy are the numbers you obtained from the output of pa_devs. You need to run sdr-core from the ../dttsp-pa/src directory. All of this is explained above. Don't forget to set permissions on the script files so that you can execute them!
Here is a listing of what appears in the "Messages" window of qjackctl when I start the jack server using qjackctl and the qjacksdr script discussed above:
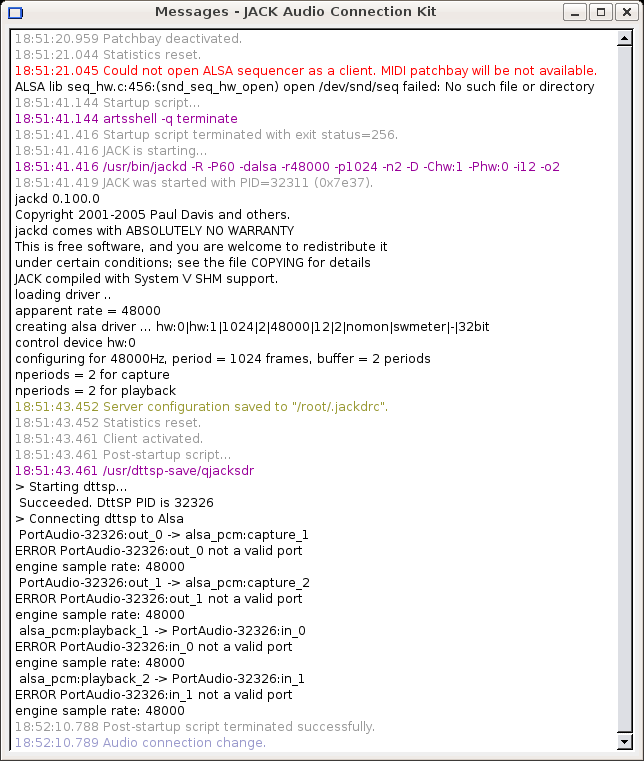
Note that although there are messages of the type "ERROR PortAudio-5336:out_0 not a valid port" [etc.], PortAudio starts up fine and in fact connects these ports appropriately. I suspect that the errors are due to the significant delay that occurs before the connections are made [approximately 22 seconds].
2. To use the Freebob backend to jack with qjackctl and PortAudio, with the Presonus Firebox sound system:
First start qjackctl and click on "Setup" from the main qjackctl GUI. This will bring up the setup screen. Set its parameters as shown here and then click on "OK" or "Save" on the setup page to save the parameters:

Now click on "Cancel" to get back to the main qjackctl GUI. Next "Start" the jack server using qjackctl by clicking on the "Start" button. You should see a window that looks like:

The device labels are some of those that you need to know to manually set things up to work with your particular soundcard. As long as you use qjackctl's GUI, it keeps track of things for you. At this point, you have not started DttSP, and so the DttSP devices are not visible.
Next you need to figure out what device number PortAudio is going to give the DttSP devices, so that you can set these parameters when you start DttSP (sdr-core). Go to the /usr/portaudio/v19-devel/bin directory and type "./pa_devs". You will get a listing of device numbers generated by this PortAudio script. I need to use the freebob driver for my Presonus Firebox, and the pa_devs output showed as the last device:
---------------------------------------
device #11
[ Default JACK Audio Connection Kit Input, Default JACK
Audio
Connection Kit Output ]
Name = freebob_pcm
Host API =
JACK Audio Connection Kit
Max inputs = 6, Max outputs = 8
Default
low input latency = 0.000
Default low output latency =
0.000
Default high input latency = 0.000
Default high output
latency = 0.000
Default sample rate = 48000.00
Supported
standard sample rates
for half-duplex 16 bit 6 channel input
=
48000.00
Supported standard sample rates
for half-duplex
16 bit 8 channel output =
48000.00
Supported standard sample
rates
for full-duplex 16 bit 6 channel input, 8 channel output
=
48000.00
----------------------------------------------
so I knew that I needed to use device #11 for DttSP with PortAudio.
So, with qjackctl running and the jackd server invoked and the Connect window showing I next went to the directory /usr/dttsp-save/dttsp-pa/src and typed "./sdr-core --sndev-in=11 --sndev-out=11 -s -m" [note that I had already created the SDRcommands, SDRmeter, and SDRspectrum fifos; see above or look in the qjacksdr script]. This started sdr-core and the DttSP devices appeared in the Connect window which then looked like this:

This was great but I needed Linein 3+4 for the Firebox, NOT Mic/InstIn 1 + 2. It was just a matter of highlighting and connecting/disconnecting the appropriate devices using the GUI to get the proper setup so that I could hear the SDR-1000 using DttSP-pa. After setting things properly, the Connect window looked like this:

The GUI now shows also the PortAudio DttSP device labels needed: PortAudio-7511:out_0, PortAudio-7511:out_1, PortAudio-7511:in_0, and PortAudio-7511:in_1. The numerical designation is the PID and changes each time DttSP is run. The script below takes care of figuring out what it is so that you can automatically start DttSP, setup the connections properly, and start sdr-shell each time you start the jackd server from qjackctl.
Once all of the was done, I wrote a couple scripts, modified from Edson Pereira's sdr.sh script, to get everything setup automatically and started automatically each time the jackd server is started from within qjackctl. One of these scripts is invoked when the jackd server is started from qjackctl, and the other is invoked when the jackd server is stopped from qjackctl. The startup script is called qjacksdr and is here, and the stop script is called qjackctl-sdr-stop and is here. You set up qtackctl to use these by going to the "Options page" and setting it up as shown here:

Clicking on the "..." button will bring up a directory listing so you can select the desired script files. As noted above, you will need to modify qjacksdr to reflect your particular system environment and soundcard setup. You can figure out what soundcard settings to use by looking at the output of ../v19-devel/test/pa_devs and also by running qjackctl without the scripts and after you have DttSP-pa installed, running it by typing "./sdr-core --sndev-in=xxx --snd-dev-out=yyy -s -m" where xxx and yyy are the numbers you obtained from the output of pa_devs. You need to run sdr-core from the ../dttsp-pa/src directory. All of this is explained above. Don't forget to set permissions on the script files so that you can execute them!
With this version of DttSP, you can have multiple instances of sdr-core running and thus many radios running at the same time. Here is an example of the qjackctl Connect window where I have 6 instances of sdr-core running at the same time. By defining different 'pipes' or fifos for each radio, you could have 6 different SDR's running and controlled from the same computer screen at one time!

With PortAudio and Jack Audio Connection Kit [qjackctl] and Jack you can play many interesting games with DttSP. Here is a screendump taken with mhWaveEdit playing back at 1/5 speed a portion of the 20 meter cw band it recorded minutes before. With the slow-speed input to DttSP and SDR-Shell you can easily read the Morse Code as it travels down the waterfall. On the left you see "OK Ted 7...", then "til es hpe to", then "yrs / so", and on the very right, "es sun nice":

With the Jack Audio Connection Kit [qjackctl] it is easy to hook the mhWaveEdit sound recorder/editor/player to the inputs and outputs necessary to first 'steal' and record the input to DttSP from the soundcard and then to process it and play the processed file back into the input to the DttSP so that the processed file now serves as the input to DttSP and SDR-Shell, just as if it were coming directly from the SDR-1000.
I hope the above is helpful to you. If you have problems, join the dttsp-linux yahoogroup and let me know how I can help! This link should get you to the yahoo dttsp-linux homepage, from which you can join the group if you don't already belong. You need to join to read the posts, etc.
11. How to use separate soundcards for input and output
If you want to
use separate soundcards for input and output like I do, then you may
need to figure out the alsa assignments for your devices and
soundcards. These can change when you reboot, as I discovered [as
others had before me]. Typing:
cat /proc/asound/cards will show
you how alsa numbers the soundcards
cat /proc/asound/devices will
show you how alsa numbers the devices.
Note that [1- 0] becomes
hw:1,0 when you are giving parameters to jackd, and you can shorten
this to hw:1.
You will need to change the line that invokes jackd to something like:
"$JACKD -d alsa -P hw:2 -C hw:0 -p1024 -n2 &"
the
–d alsa says that alsa is the sound driver
-P hw:2,0 means that
I am using the second soundcard, subdevice 0 as playback device
-C
hs:0,0 means that I am using the zeroth soundcard, subdevice 0 as
capture device
If you are sampling at 96000 Hz, you may need to change p1024 to something less; I have to use p128. If you make p too low, you may start getting xrun errors.
You should be able to prevent Alsa from reordering the soundcards when you reboot by altering the file /etc/modprobe.d/alsa-base. At the end of that file are some lines of the form:
options snd-xxxxxx index=x. If you set these up for your cards using the names for your sound modules it will set the ordering of the soundcards. One example would be:
options
snd-intel8x0 index=0
options snd-ice1712 index=2
which will set the onboard sound to index=0 and the Delta44 to index=2. You need to do this for EVERY driver module that gets loaded. If you don't, the one you 'miss' may get loaded as index=0 and thwart your efforts. This page gives you more information on this subject: http://alsa.opensrc.org/MultipleCards .
How to use OSS instead of alsa
If
you use OSS instead of Alsa, several script modifications are
needed:
"$JACKD -d alsa -P hw:2 -C hw:0 -r$SDR_DEFRATE
-p1024 -n2 &"
becomes
"$JACKD -d oss -P /dev/dsp
-C /dev/dsp4 -r$SDR_DEFRATE -p1024 -n2 &".
If
you are sampling at 96000 Hz, you may need to change p1024 to
something less; I have to use p128. If you make p too low, you may
start getting xrun errors.
change:
echo "
sdr-$DTTSP_PID:ol -> alsa_pcm:playback_1"
$JACKC
sdr-$DTTSP_PID:ol alsa_pcm:playback_1
echo "
sdr-$DTTSP_PID:or -> alsa_pcm:playback_2"
$JACKC
sdr-$DTTSP_PID:or alsa_pcm:playback_2
echo "
alsa_pcm:capture_1 -> sdr-$DTTSP_PID:il"
$JACKC
alsa_pcm:capture_1 sdr-$DTTSP_PID:il
echo "
alsa_pcm:capture_2 -> sdr-$DTTSP_PID:ir"
$JACKC
alsa_pcm:capture_2 sdr-$DTTSP_PID:ir
to:
echo "
sdr-$DTTSP_PID:ol -> oss:playback_1"
$JACKC
sdr-$DTTSP_PID:ol oss:playback_1
echo " sdr-$DTTSP_PID:or ->
oss:playback_2"
$JACKC sdr-$DTTSP_PID:or oss:playback_2
echo
" oss:capture_1 -> sdr-$DTTSP_PID:il"
$JACKC
oss:capture_1 sdr-$DTTSP_PID:il
echo " oss:capture_2 ->
sdr-$DTTSP_PID:ir"
$JACKC oss:capture_2 sdr-$DTTSP_PID:ir
12.
How to use OSS instead of alsa
The
/dev/dsp numbers depend on how you have OSS configured. Unlike the
stock alsa configuration, OSS will NOT change the order of the
soundcards when you reboot. This eliminates a major annoyance. The
easiest way to determine what devices are available on your system is
to type "/lib/oss/bin/./ossinfo" which will give you a list
of all of the devices. The output from this looks like this on my
computer which has 2 delta44's and onboard sound as
well:
----------
debian:/lib/oss/bin# ./ossinfo
Version
info: OSS/Linux 3.99.4b (0x00040000)
Number of audio devices:
24
Number of MIDI devices: 0
Number of mixer devices: 4
MIDI
devices (/dev/midi*)
Mixer devices (/dev/mixer*)
0: AC97 Mixer
(AD1980) (Mixer 0 of card 0)
1: M Audio Delta 44 (Mixer 0 of card
1)
2: M Audio Delta 44 (Mixer 0 of card 2)
3: Virtual Mixer
(Mixer 0 of card 3)
Audio devices (/dev/dsp*)
0: Intel ICH6
(266E) (audio port 0 of card 0)
1: Intel ICH6 (266E) (shadow)
(audio port 1 of card 0)
2: M Audio Delta 44 out1/2 (audio port 0
of card 1)
3: M Audio Delta 44 out3/4 (audio port 2 of card 1)
4:
M Audio Delta 44 in1/2 (audio port 10 of card 1)
5: M Audio Delta
44 in3/4 (audio port 12 of card 1)
6: M Audio Delta 44 input from
mon. mixer (audio port 20 of card 1)
7: M Audio Delta 44 (all
outputs) (audio port 0 of card 1)
8: M Audio Delta 44 (all inputs)
(audio port 10 of card 1)
9: M Audio Delta 44 out1/2 (audio port 0
of card 2)
10: M Audio Delta 44 out3/4 (audio port 2 of card
2)
11: M Audio Delta 44 in1/2 (audio port 10 of card 2)
12: M
Audio Delta 44 in3/4 (audio port 12 of card 2)
13: M Audio Delta
44 input from mon. mixer (audio port 20 of card 2)
14: M Audio
Delta 44 (all outputs) (audio port 0 of card 2)
15: M Audio Delta
44 (all inputs) (audio port 10 of card 2)
16: OSS Virtual Mixer
v2.5 Playback CH #0 (audio port 0 of card 3)
17: OSS Virtual Mixer
v2.5 Playback CH #1 (audio port 1 of card 3)
18: OSS Virtual Mixer
v2.5 Playback CH #2 (audio port 2 of card 3)
19: OSS Virtual Mixer
v2.5 Playback CH #3 (audio port 3 of card 3)
20: OSS Virtual Mixer
v2.5 Playback CH #4 (audio port 4 of card 3)
21: OSS Virtual Mixer
v2.5 Playback CH #5 (audio port 5 of card 3)
22: OSS Virtual Mixer
v2.5 Playback CH #6 (audio port 6 of card 3)
23: OSS Virtual Mixer
v2.5 Playback CH #7 (audio port 7 of card 3)
----------
When
you look at this, you can see why my playback device is /dev/dsp
[/dev/dsp0] and my input device is dev/dsp4.
Back
to top
13. Install dttsp, SDR-1000 control software,and GUIs as a Debian archive ( .deb ) file
[NB Debian file is currently out of date and will not work with current versions of Ubuntu. I hope to find the time to make a new one some day.]
THIS is the easiest way to get started.ing. I have created versions of the .deb file for both i386 [standard Intel x86] and amd64 [64 bit version for amd64 and intel 86_64] processors. Your system should automatically choose the correct version for your processor, although you can override this choice by changing /etc/apt/apt.conf to reflect your choice of architecture.
I have created a Debian archive file "dttsp.deb" that can be used with systems with alsa sound, oss, and freebob sound drivers. It will automatically install dttsp, the sdr-1000 hardware control software, and the GUI shells sdr-shell written by Edson Pereira and gbeppe and gsdr written by John Melton, as well as the sdr.sh script written by Edson and slightly modified by me, and the SDR-1000 hardware control GUI written by me, W3SZ. Depending on your hardware, the sdr.sh script in the /dttsp/sdr directory may need to be modified slightly for things to work on your system. But chances are, if you have a 'stock' Ubuntu system, it will run right off the bat. If you want to run OSS instead of alsa, then you will have to modify the file /usr/sdr/setup_env or the script sdr.sh to set the variable SND_DRIV to "oss" for this script to work properly with OSS. If you want to run alsa, the standard sound that comes with Ubuntu Desktop, you can leave the setup_env file alone. To run at 96000 Hz sampling rate [assuming that your soundcard is capable of this], you need to change the file setup_env [or the sdr.sh file] so that SDR_DEFRATE is 96000 instead of 48000. One of my machines has two Delta44 cards and onboard sound, and the OSS parameters given in the script are those that work with this hardware. The alsa parameters are those originally supplied by Edson . They work right out of the box with my Laptop and its stock sound. I generally run freebob and the PreSonus Firebox with the laptop, and how to do that is described in 15 below.
Here is the procedure to get things running via this route:
To install the software contained in the dttsp.deb file you need to update your Apt sources list, which is at /etc/apt/sources.list. Edit your /etc/apt/sources.list file by adding this line at the end:
"deb debs etch main non-free contrib". Then type "apt-get update" so apt has the new information.
If you have already installed my dttsp.deb file, type "apt-get remove dttsp" before you do "apt-get update".
Then, to install the dttsp.deb file just type "apt-get install dttsp" and apt-get will go to the internet and get the dttsp.deb file and dttsp, the SDR-1000 hardware control software, and the GUIs mentioned above should then be installed on your computer. Apt-get will at the same time get the necessary files to satisfy the dependencies of dttsp.deb. The files will be placed into the directories /usr/sdr and /usr/local/bin.
You may need to set SDR_DEFRATE outside the shell the first time you run things [unless it is already set on your computer]. To do this, type at the command prompt:
"export SDR_DEFRATE=48000" (without the quotes). You can get your computer to remember this on subsequent reboots [if you installed one of the dttsp-xxx.deb packages above] by putting the following lines in your /etc/profile file, near the end:
SDR_DEFRATE=48000
export SDR_DEFRATE
and then save the file with the changes. If you have a 96000 Hz soundcard you can set it to 96000 Hz if you want after you have shown that it works at 48000 Hz. You will then also need to change the file setup_env as noted above. Also, to get 96000 Hz to work here with OSS, I had to change the jackd parameter p2014 to p128 [or 256].
THAT'S IT, THE INSTALLATION IS COMPLETE! NOW YOU CAN START TO PLAY:
To run dttsp, etc. just type from any directory:
"sdr start" ["sudo sdr start" if you are not root], and then jack and sdr-core will start and the necessary jack connections will be made.
You can then type "sdr-shell &" or "gsdr" or "gbeppe" and the appropriate shell will start. I have confirmed that this works properly with Edson's sdr-shell with alsa sound on my laptop, and with oss sound and this shell on my main system. On the main system I have also confirmed that gsdr and dbeppe work properly at both 48000 Hz and 96000 Hz [with oss and the Delta44 for input and onboard sound for output].
To start the SDR-1000 hardware control GUI, just type "sdr1000". More info on this GUI is given in 16 below.
If you need help using two sound cards, or with using OSS instead of alsa, check the links for each by clicking appropriately.
If you have
trouble after upgrading/installing the dttsp.deb file with an error
of the type: "/usr/local/bin/sdr-core: error while loading
shared libraries: libjack.so.0: cannot open shared object file: No
such file or directory", the problem is likely a 'lost' link to
libjack.so.0, I think.
This is what I recommend to solve this
problem:
updatedb
locate libjack.so
Look at your
libjack choices from the locate statement. Mine
were:
/usr/lib/libjack.so
/usr/lib/libjack.so.0.0.23
/usr/local/lib/libjack.so.0.0.23
/usr/local/lib/libjack.so
/download/jack/libjack/.libs/libjack.so.0.0.23
/download/jack/libjack/.libs/libjack.so.0
/download/jack/libjack/.libs/libjack.so
so
I just did
ln -s /usr/lib/libjack.so.0.0.23
/usr/lib/libjack.so.0
and then everything worked fine.
Let
me know if that does/does not work for you.
Let me know whether or not this works easily for you. Thanks!
---------------
Making the Repository [Ignore this unless you want to make your own .deb files for distribution]
The text below describes how I made the .deb files and the repository, and gives some details on how I made the packages. You can ignore it unless you want to do the same.
dttsp.deb is the Debian archive file I created in order to take care of the dependencies that crop up when trying to install the dttsp series files. It was created by creating the directory /dttsp-dev with the subdirectories:
DEBIAN which contains the control. preinst, postinst, prerm, and postrm files. You can examine these files and the archive as a whole by looking at it with the command "ar tv dttsp.deb" to see the file structure or "ar x dttsp.deb" to extract the files.
/usr which contains the subdirectories /usr/sdr and /usr/share/doc/dttsp to contain the copyright and changelog.gz files
/usr/sdr which contains the subdirectory sdr. The sdr directory contains executable [binary] files as well as various scripts, 'ini' files, and several GUIs.
In order to make the .deb file follow the Debian Policy closely enough to attain zero errors on checking with 'linda', I needed to make the base directory /usr/sdr [rather than just /sdr] and I needed to remove the .svn directories that had come along with the download of code via subversion. I also needed to strip all of the binaries using 'strip xxxxxx' for binary xxxxxx. I also needed to get rid of unneeded binary comments using 'strip -R .comment xxxxxx' for binary xxxxxx, for example. I also needed to add a changelog.gz file and a copyright file, both placed in the directory /usr/share/doc/dttsp . Once I had all of this syntactical stuff correct, I created these Debian archive files by first populating the directory /dttsp-dev/ with these files and directories and then going to the directory "/" and typing:
"dpkg -b dttsp-dev dttsp.deb" to create the file dttsp.deb .
In order to create a repository that apt-get could use, I then made a Package.gz file by putting the dttsp.deb file into the directory "/debs" and typing from the "/" directory: "dpkg-scanpackages debs /dev/null | gzip > debs/Packages.gz". This created the Package.gz file [an 'index' of the /debs directory] for apt-get. I then made the directory /debs on the w3sz.com website. A subdirectory /debs within the directory /debs there holds the .deb file, and the directory /debs/dists/main/contrib/binary-i386 holds the file Packages.gz. This structure allows this website to function as a Debian Repository so you can seamlessly use apt-get with it. (Repository Discontinued)
More recently, because my repository now has both i386 and amd64 versions of some packages, and several different deb files [dttsp, xlinrad, xlinrad-1000 for example], the directory structure has become more complex. The 'root' repository directory is the ../dists directory, and it contains a directory structure created using several scripts that I wrote, with the entire path ../debs/dists/etch/contrib/binary-amd64|binary-i386|source/.
On my computer the repository directory structure is created in the folder /packages. Dttsp.deb is created from the directory /dev-dttsp, dttsp i64 version from the directory /dev-dttsp64, xlinrad from /dev-xlinrad, and xlinrad-1000 [xlinrad with FT1000 control] from /dev/xlinrad-1000. The script debmaker is run from the / directory and first creates .deb files for each of these applications, then copies them to the appropriate directories in the /packages repository directory, and then runs the script update-archive.sh which generates the Packages and Contents and Release files required by the Debian Repository system. This file uses the apt-ftparchive.conf and apt-dapper-realease.conf files for configuration. Once all of this is done, the contents of the /packages directory are uploaded to the Debian repository, maintaining the appropriate directory structure.
What the .deb file does on your system
When this file is installed using apt-get it will:
Create a directory /usr/sdr. It will also create some symbolic links and fifos as will be noted below. It will create the directory /usr/share/doc/dttsp and put the copyright and changefile.gz files there as well.
The directory "sdr" and its subdirectories contain the source and executable files for:
sdr-core by Bob McGwier, N4HY, and Frank Brickle, AB2KT
sdr-shell by Edson Pereira PU1JTE/N1VTN
gsdr by John Melton G0ORX/N6LYT
gbeppe also by John, G0ORX/N6LYT
the SDR-1000 hardware control software by Eric, Bob, and Frank
the SDR-1000 hardware control GUI by Roger Rehr, W3SZ
and the script sdr.sh by Edson Pereira that starts the sdr-core software, slightly modified.
Installing the .deb file will also establish symbolic links so that you can run:
sdr.sh by typing sdr ["sudo sdr" if you are not root]
sdr-shell by typing sdr-shell
gsdr by typing gsdr
gbeppe by typing gbeppe
sdr1000, the SDR-1000 hardware control GUI, by typing sdr1000 from any directory.
It will also set up the necessary fifos in /dev/shm.
You may wish to create the file /etc/X11/Xsession.d/75local-profile so that IF you add the lines:
SDR_DEFRATE=48000
export SDR_DEFRATE
to /etc/profile
your system will save the SDR_DEFRATE parameter when you shut down so that you don't need to retype it each time you start sdr-shell after rebooting. Note that your system may already save this variable at shutdown. Whether or not it does so is dependent upon your exact xdm/gdm X11 configuration.
To keep the system clean, I set up the .deb file so that before installing it attempts to remove the above-named links and fifos so that there are no conflicts with pre-existing files or links. It also attempts to remove all of the installed files and links except for the file /etc/X11/Xsession.d/73local-profile if you uninstall this package, again to keep things clean.
Good
luck! I am having a blast with this. Thanks Eric and Frank and Bob
and Edson and John and Takafumi etc! Let me know if there are any
problems.
Copyright © 1997-2009 COPYRIGHT Roger Rehr W3SZ.
All Rights Reserved
Brought to you by the folks at W3SZ